Even if you’re not a tournament angler, fishing is something of a competitive sport. Pick any well-known Chesapeake Bay fishing spot, for example, and on any given sunny Saturday there’s likely to be a dozen or more boats there. Everyone—yourself included—is trying to catch from the same pool of fish. So, how will you get a leg up on the competition? How will you out-fish the rest of the crowd? One way is by learning how to fully utilize your electronics. Few anglers ever really figure out how to do so, but these five tips will help make it happen.
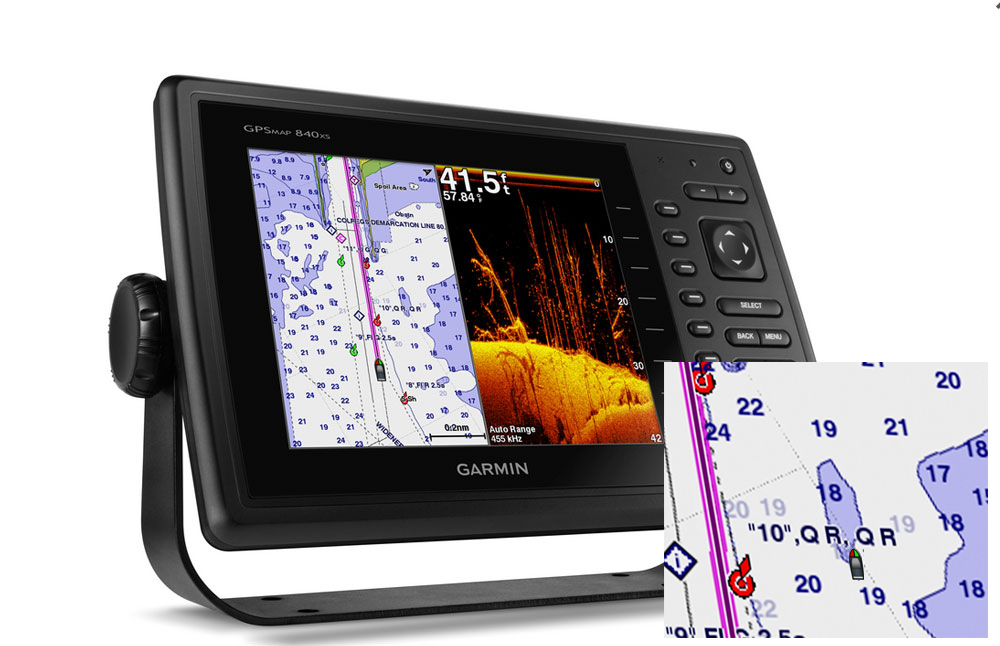
- ZOOM IN FARTHER on your chartplotter. Most anglers know to hit the MOB or Waypoint button the moment they have a strike, so they can return to the exact same spot over and over again. But many people fail to fully utilize this function because they don’t zoon their chartplotter in all the way. Zoomed out to a fraction of a mile or worse yet to the wide range you used for navigating to the area, the icon representing your boat covers a swath of water that extends well beyond your own casting distance. Same goes for the icon representing the hotspot. When you go back to that spot it may look like your boat is sitting right on top of the exact location—but that’s because your “boat” is 300’ or 400’ long in comparison to the geographic area being represented. If you zoom in to a matter of feet instead of miles, you may discover your boat is actually far off-target. Most of the time this means zooming in so close that chart details like depth contours disappear; if you see them, keep zooming in. As an example, when fishing over a structure the size of an 18-wheeler, you should have your chartplotter zoomed in to 100’ at most and more likely, to a mere 50’ range.
- FORGET ABOUT using radar to spot birds in the bay. Unless it’s a rough and rainy Wednesday this is a fool’s errand, because the bay’s usually just too darn crowded. Zoom the radar out to five miles, and you’ll likely see as many returns as you would in Norfolk during a Homeland Security drill.
There is, however, a solution to this problem: get a pair of gyroscopic-stabilized binoculars with 14X or higher magnification. While regular old marine binoculars will help you spot birds out to a few miles with their 7X magnification, gyro-binocs will help you see a whole lot farther. In fact, using a pair of Fujinon 14X Techno-Stabi binoculars I’ve launched at Point Lookout and spotted birds working a couple of miles just off the Virginia shore—a distance of seven or eight miles. Yes, it’s true these things aren’t cheap (the Fujinons go for around $1,200) but I honestly think they lead me to fish nearly as often as my fishfinder does.
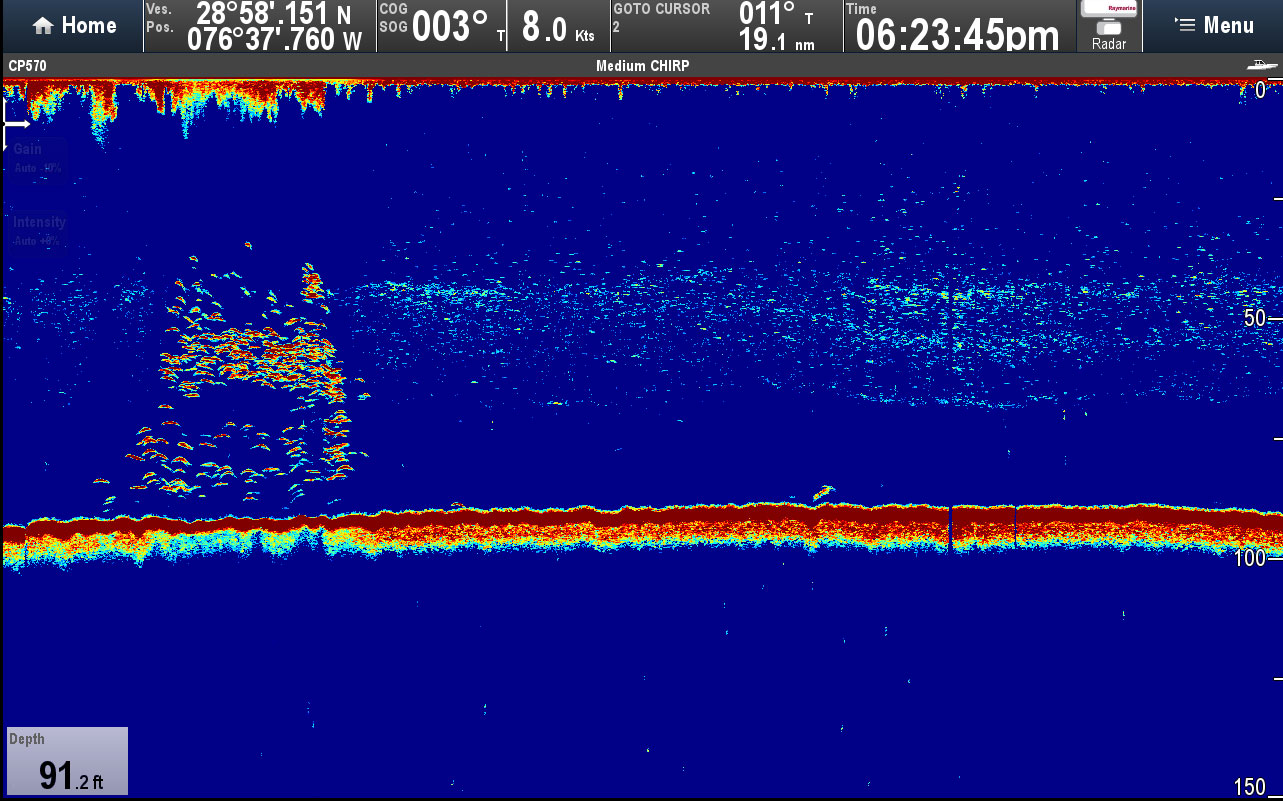
- GOOSE THE SENSITIVITY on your fishfinder, if it doesn’t regularly display thermoclines. Thermoclines are incredibly important for bay anglers to recognize, especially early in the season. These are temperature barriers, which are where different bodies of water meet. But the bodies of water aren’t only made distinct by temperature. On one side or the other of a thermocline there may also be significant differences in salinity, turbidity, and oxygen content. As a result, fish will often hold just above or just below the thermocline.
Some modern fishfinders display the thermocline just fine when they’re set to auto-sensitivity, but some don’t. Ironically, some of the best units are so advanced at scrubbing clutter from the screen that they also eliminate the thermocline. Others may show significant and abrupt thermoclines, but not more discreet changes. In any case, the thermocline presents itself as a somewhat faded broken return, more or less like the clutter of false-returns but in a narrow band, which remains at a constant depth. If you don’t see these on-screen with some regularity, especially early in the year when they tend to be common and substantial in the Chesapeake, shift your unit into manual mode and try keying up the sensitivity a bit.
- LEARN HOW TO READ bottom type on your fishfinder. Many anglers think they already do but are mistaken, because the way bottom readings appear on a fishfinder screen is counter-intuitive. You’d think a hard bottom would provide a strong, thick reading. But in fact, it’s a soft bottom that creates a thick line on the meter. This happens because a soft muddy bottom absorbs some of the fishfinder’s sonar wave. Conversely, a hard shell or rock bottom bounces it back abruptly, creating a thin line on the meter. Sand bottoms create a line that lies somewhere in-between.
5. START SELF-CHARTING. Almost all of the new electronics on the market today allow you to gather the pings from your fishfinder and the position data from your GPS, simultaneously, and then use that data to re-draw the chartography inside your chartplotter. Many older units can accomplish the same feat, with a software update. And this ability gives you an immense advantage over everyone using the standard chart-chips that always seem to insist it’s 40’ deep even when your fishfinder says there’s 20’ of water under the keel. After a season of gathering data, you’ll have a far more accurate view of the areas you commonly fish—and you’re bound to learn something new. When I first started self-charting outside the South River, for example, I discovered that a series of lumps charted just south of the Green #1 were actually connected, and form a sort of zig-zagging ridge. I also discovered it extended significantly farther than I had believed. This allowed me to better position the boat for drifts, and instead of spending five minutes fishing followed by five minutes of re-positioning, I was able to spend 10 minutes fishing followed by five minutes of re-positioning.
If you have the Navionics app on a cell phone and a WiFi-enabled MFD, this process is even easier. You can pre-set the app to “recognize” the MFD’s WiFi whenever you step aboard, and do all the data collection and updating automatically. And if you have side-scanning ability, you can gather data for large swaths of water all at once. The technology might be a bit of a PITA to figure out, but the rewards are awesome.
Electronics are, of course, just one of the many tools at your disposal that can help you catch more fish. Keep these five tips in mind, however, and you’ll be able to use those electronics far more effectively. Add in a dash of luck, and soon you’ll be out-fishing the competition.
- by Lenny Rudow