Cheap fishing boats aren't a dime a dozen and there are plenty of products that purport the potential to take even the newest fishing beginners to the elusive “next level.” But whether they be laser-enhanced lures, vibrating rods, or motorized bobbers, when it comes to getting a better handle on angling, no gambit of gimmicks can ever truly beat a boat. Now, you might be thinking “sure, but I could get a shiny new rod and reel for a few hundred bucks. A fishing boat will cost me an arm, a leg, and my hairline.” Not too long ago, I was in the same boat (or rather I wasn’t) because, as a college student, I tend to be a little strapped for cash. At the end of last year, in an attempt to save up for a couple of nice new rod and reel combos, I had been living off of store-brand ramen and crab-steaming-quality beer. But when I finally did scrape the money together, I decided to get myself a fishing boat instead. And for less than $500, I managed to get a brand-new two-person boat with a motor, battery, rod holders, lights, a bilge pump, lots of fun rocker switches, and a place to charge my phone (I am a college student after all) — all while still fitting in the back of my car. That being said, some assembly was required.
Finding Cheap Boats
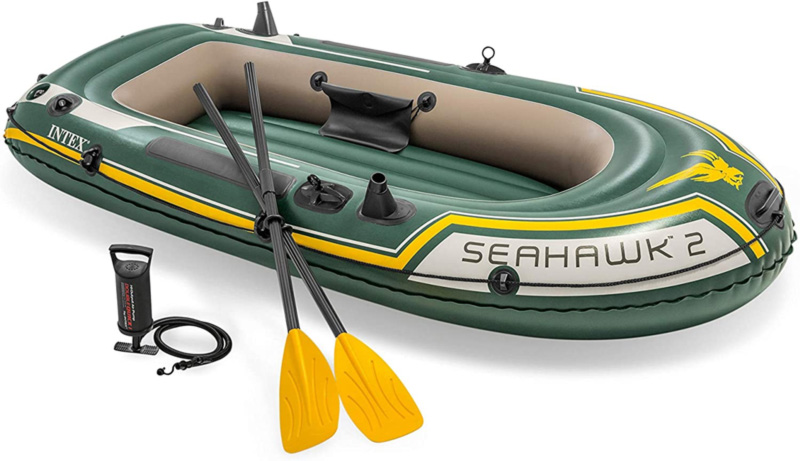
As many of humanity’s great undertakings have, mine started with a late-night impulse buy on Amazon. I typed “fishing boat” into the search bar and, lo and behold, the Intex Seahawk 2 appeared. It was an eight-foot inflatable boat with a two-person capacity, three air chambers, two rod holders, oars, and a rating of 4.5 stars off of more than 5000 reviews. Best of all, it was only $60 with shipping and handling. I ordered it and less than a week later, I was fishing off of it in the St. Mary’s river.
It was great to be able to get to spots I could never reach from shore, and it still looked like new after a dozen or so outings. However, it wasn’t all smooth sailing. Or, rather it was. A strong gust would send it flying across the river, firm casts threw it into a tailspin, a large perch could pull it off course, and while the inflatable deck was comfy, it also made it impossible to move around in. Worst of all, a passerby told me they liked my “raft.” So, again I turned to the internet.
It turns out fishing fanatics and boating boffins love modifying these Intex inflatables. People add decks, seats, trolling motors, stereos; one guy even fitted his 12-foot Excursion 5 with a cabin (Davenwolf Dagger on YouTube). So, I decided that I was going to try my hand at building the ultimate boat on a budget.
Making a Cheap Fishing Boat Better
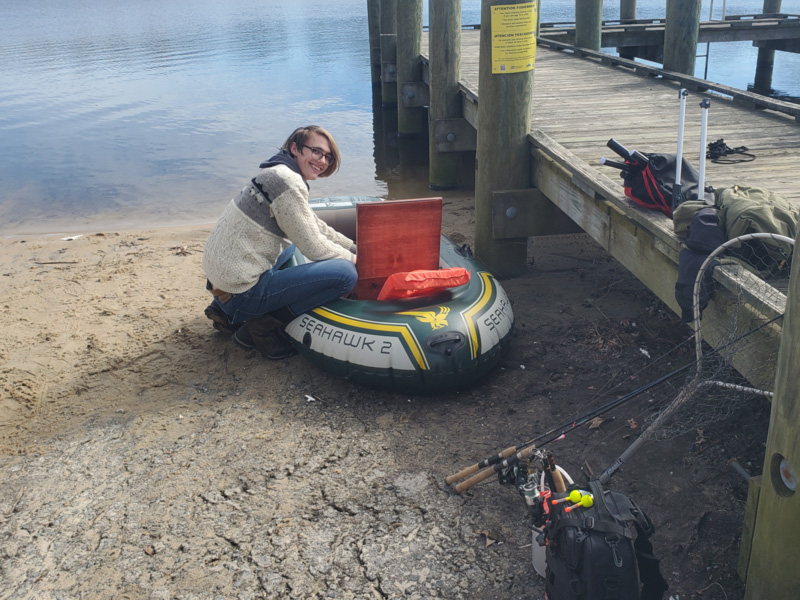
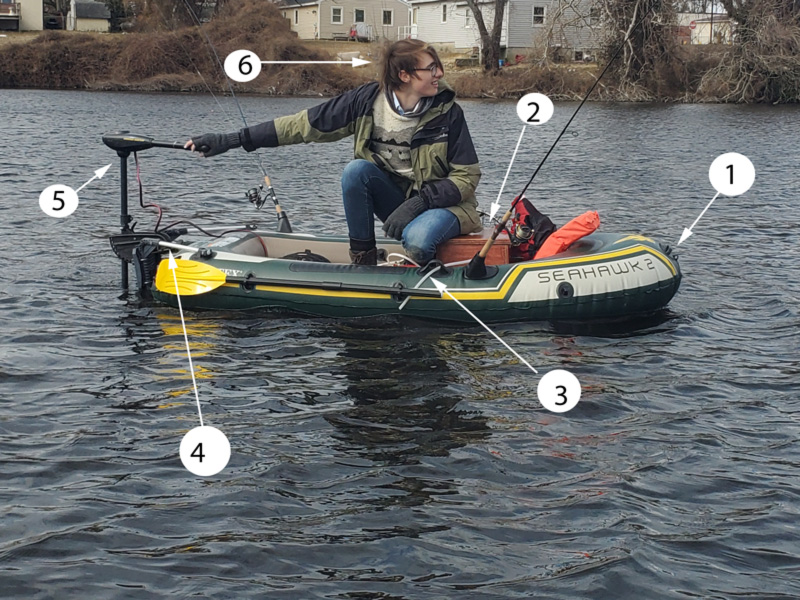
The first step was building a deck. I bought a sheet of half-inch plywood ($25), half a pint of wood stain ($8), and a quart of Varathane Spar Urethane ($18). To transfer the shape of the deck to the plywood, I taped a large piece of paper to the bottom of the boat and traced the outline of the inflatable deck. Then, I traced the outline on the plywood and brought the line in half an inch using a compass and permanent marker. Next, I cut out the shape using a jig saw and planed and sanded the edges until the lines from the permanent marker were scarcely visible. The deck shape didn’t have to be too precise, but test-fits helped figure out the tolerance. Then, I cut three holes in the deck using a spade bit. One was for accessing the fill nozzle and the other two were so that I could eventually run wires underneath the deck from a battery to a trolling motor. I cut a small channel between the two holes using a scroll saw to inlay the wires.
Next, I rounded off all the edges of the deck with a hand plain (sharp corners and inflatables are notoriously poor bedfellows) and sanded everything down with progressively finer sandpaper. I coated the deck with several coats of stain over the course of a couple warm days. Once it was dry, I sanded it lightly and applied Spar Urethane. Seeing as it was the middle of winter, I found the best way to speed up the drying process was to place it in a small tent with a space heater. Note: I would recommend that Spar Urethane only be used in places with adequate ventilation, lest you wish to forget what year it is (which as of this past December I did).
Between coats, I used the remainder of the wood to build a box with a hatch for the foredeck to function as a seat and a housing for the battery, electronics, and general stowage. Because I didn’t want to fall into the box or skewer myself on the screws for the hinges, I formed the hatch by layering two pieces of plywood and laminating them with wood glue and short nails, then finished it off by forming a round over on the aft side with a hand plane for aesthetic purposes. On the aft face of the box, I cut out holes for a four-gang switch panel and a battery level indicator. Then, I repeated the coating process I used for the deck on all surfaces.
I next glued the box to the deck using construction adhesive. After letting it dry for 24 hours, I reinforced the connection using a pair of shelf brackets ($2 each) and inlayed the bolt heads using a Dremel, sealing the bolt holes with more construction adhesive. Finally, I attached the hatch to the box using a pair of hinges ($15).
At this point, I had invested $70 and about 30 hours into my $60 boat over the course of two weeks. However, this was just the beginning.
Cheap Fishing Boats Become Expensive
The next step was the wiring, which was divided into two parts: the leads from the battery to the trolling motor, and the wiring for the lights, charging ports, and water pump. The two leads for the trolling motor were made from five-foot lengths of eight-gauge marine-grade wire with terminal connectors at either end, and bolts to fasten them to the leads on the motor ($20). The wires were run underneath the deck and secured with the discerning boat builder’s secret weapon: duct tape. I drilled holes into a small plastic container to isolate the terminals from one another and any misplaced limbs.
All of the periphery electronics were connected to the battery through a fused four-gang switch panel ($25) with a 12-volt cigarette lighter and two USB ports. Another switch was used to power up the LED voltage gauge ($8). Next, I wired in anchor and nav lights ($40). I used 16-gauge marine wire ($16 for a 30-foot spool) to connect up the lights and waterproof connectors ($1.25 each) so that they could be removed. The wires for the anchor light were run under the deck alongside the motor leads. Then I soldered the male connector to the traditional light post plug on the light. The red and green navigation light was wired almost identically except that the wires ran through the front of the battery box. The lights were designed to run off two D-cell batteries, so I used a bulk converter ($0.75) to step down the voltage from 12 to three volts. The navigation lights were attached to the foreside of the box with a clamp, but I attached the anchor light to the trolling motor mount using a cheap bike stem ($8).
Obviously, it would be slightly insane to take this rig out at night, but I’d be damned if anyone was going to call my boat a raft ever again.
Finally, I wired in a small water pump ($10) to bail water from under the deck. It was wired to the last remaining switch and sat in the battery box. A quarter-inch tube ($9 for 10 feet) was run under the deck through the hole for the wires and another was fed through the starboard side of the box and over the side of the boat.
Installing the electronics ended up costing a little less than $140, bringing cost up to just shy of $270. Though wiring everything up was a lot less labor-intensive than building the deck it still managed to take me upwards of 10 hours — granted, a lot of that time was spent redoing my awful soldering, re-crimping connections, and shrinking heat shrinks after tucking them into hard-to-reach places.
Cheap Outboard Motors
Okay, that $500 figure may seem a little steep for a bargain-basement boat, but here’s the bottom line: trolling motors are not so cheap. A new Minn Kota 55lb Endura will set you back a cool $250, and you’ll have to tack on at least another $100 for a 12-volt battery. But worry not, here’s my tip for thrifty boat builders: skimp on the motor, not the battery.
I actually managed to borrow a motor from a kindly compatriot, but you can find used electric motors online for less than $80. When it came time to buy the battery, I got some advice on getting one on the cheap: don’t. I spent $180 on a 75-amp-hour 12-volt deep-cycle battery from West Marine. That might seem like a lot, but it came with a 12-month warranty and peace of mind in knowing that some extra effort was put into keeping the lead and sulfuric acid where it’s supposed to be.
I picked up a motor mount kit from Intex ($30) and attached two six-foot pipe insulators ($1 each) to the side of the deck to stop it rubbing against the inside of the boat. It was ready to go.
Setting Up Your Cheap Fishing Boat
There’s probably something to be said for inflating a boat with a small hand pump and rowing it with a pair of small plastic oars, but if there is, I certainly can’t think of it. An electric air pump doesn’t actually make things that much quicker (inflation time is about 15 minutes either way), but it does reduce arm strain. That being said, lugging a 40-pound battery down to the boat ramp is hardly a walk in the park either. Inflating the boat, installing the deck, and setting up the motor takes around 25 minutes in total, assuming the wind doesn’t decide to launch the hull before I do.
Breakdown takes a little less time but it’s best to do as much as possible while the boat’s still in the water. With the battery, motor, and deck in place, dragging the weighed-down inflatable on a rough surface could be a death sentence. Also, before rolling up the tubes I try to remove as much sand or debris as possible to reduce wear on the vinyl — and for the sake of my car’s interior.
Final Cost
All in, the boat cost $482 (rounding up for all the 99-cent malarkey) and took around 50 hours to complete. So, was it worth it? Definitely! After finishing up, I took it out pickerel fishing and had an absolute blast. It’s not what you’d call “fast,” but the motor will get it to a comfortable jogging speed and the added weight makes the boat a lot more manageable in windy conditions. I took it out on a mill pond with a steady 10- to 15-knot breeze and spent most of the time going vaguely where I wanted to. In terms of range, it could probably manage five miles at full tilt, which is plenty for an afternoon of slow-trolling. With the wooden deck it’s possible to cast standing up, and I don’t have to wince as much when I drop a hook or land a toothy fish. That being said, crabbing might be a bit of a stretch… only time will tell.
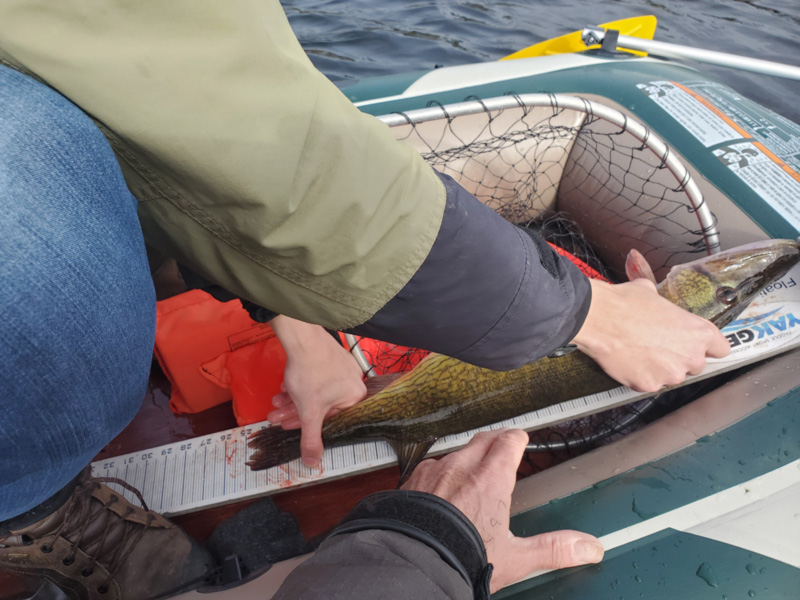
More than anything, it was just really cool to see a 25-inch chain pickerel flopping around on the deck of my very own boat. Plus, there was enough money left in my budget for me to pick up some of those laser lures.
-By Ryan Gullang