You say you've read Five Tips for Choosing a New Fishfinder, you've picked out a new unit, you have a boat sitting in the driveway, and you want to be able to see those stripers from 1000 yards away? You want to be able to tell the difference between a croaker and a spot when passing over that drop-off? You insist on having the ability to count the exact number of bunker in a school? Okay, maybe we ask a bit much of our fishfinders in this day and age. But they do represent one of the most important angling tools in our arsenals. And whether you just bought a new boat or want to upgrade an old bottom machine, installing a new fishfinder is a project many of us will attempt at one time or another. Though this is a relatively straightforward task it can be a bit daunting – especially when it’s time to drill a hole in your helm and/or hull. So follow these steps to make sure your sounder’s installation comes out right.
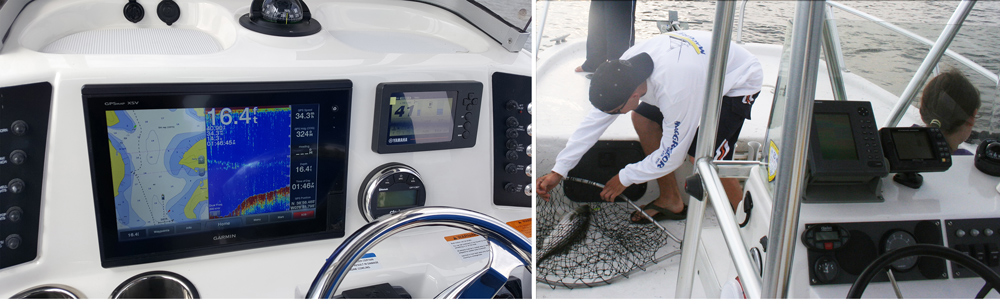
Flush-Mounting the Fishfinder
First things first: If you have a new boat and doubts about your rigging abilities, rather than risk trashing your console it may be a better move to leave this job to a pro.
If you’re comfortable cutting holes in fiberglass and mounting stuff, the job begins with picking the proper location for your head unit. This is imperative, because you need to ensure plenty of depth behind it as well as enough space on the helm itself. The most common mistake people make is failing to ensure that there are no accessories or wires behind the dash, in the spot they’re about to cut out. Actually sawing before verifying the clearance can lead to significant (ahem) issues. Take careful measurements. Twice. Okay, maybe three times.
Once you’ve chosen your spot, use masking tape to secure the cut-out template to the dash. Using a pencil, trace the template directly onto the fiberglass. Then, using your drill, open a pilot hole for your saw blade in one corner of the template. Make sure to use a drill bit large enough to allow the entire saw blade to pass through the hole. Next, insert your jig saw blade into the hole and cut open the dash, following the dimensions of the template. TIP: Run both the saw and the drill at full speed; cutting slowly will only encourage the bit and/or blade to grab and splinter the gel coat.
Once the cut-out is complete, you’ll need to drill the unit’s four mounting holes, which will also be shown on the template. Next, run a bead of 3M 4200 Fast Cure adhesive/sealant around the perimeter of the cut-out. (Note: some people prefer to use silicon as a sealant in this situation. Silicon will be easier to remove in the future, however, it’s far more likely to deteriorate over time and will likely allow water past the seal at some point down the line. Many electronics installers will debate this point and stick with silicon but in our experience the long-term reliability of 4200 makes it worth putting up with). Add blobs of the sticky goop on top of the mounting holes, as well. Then drop the unit into the cut-out, and bolt it in place.
Binacle Mounting the Fishfinder
What about binnacle (top) mounting the unit? On boats with little flush-mounting dash space, this may be necessary and the job is far easier – simply drill four holes for the binnacle mount, run a bead of sealant, bolt the binnacle in place, and drill an additional hole to pass power and transducer wires through a clamshell fitting. But this mounting technique leaves the unit exposed to the elements and to theft. It may also partially block your view through the windshield. In virtually all circumstances, if the space is available flush-mounting is the superior method.
Mounting a Fishfinder Transducer
Should you cut a hole in the bottom of your boat for a through-hull transducer, or will a transom-mount to the trick? That depends on your boat. Through-hulls are a must-have for inboard boats, because turbulence created by propwash will ruin the unit’s performance if the transducer is aft of the running gear. Stern-drive and outboard boats can go either way. Historically through-hulls have offered the best performance and in many cases that’s still true today, but modern transom-mounts have become significantly better in recent years. Add on top of that the fact that many side-scanning or 3D units are more or less designed with transom mounting in mind, and also that on many small boats going through the hull isn’t a good option anyway as much of the hull is out of the water when running. Finally, consider that transom mounts are obviously a lot easier to install. For all of these reasons, most of us who install units will be dealing with transom-mounting situations. All of that said, what if going to a through-hull is the best move in your particular case? Because of the significant risks involved in drilling a large hole in the bottom of your boat, we’d strongly recommend leaving this job to a pro.
Transom mounts are a lot easier for the do-it-yourselfer to deal with. The most important factor of installing a transom mount is choosing the transducer location. Crouching behind the transom, look for an area as deep on the hull as possible, with no strakes, intakes, or other items in front of it. Any items like these disturb water flow, which creates turbulence and degrades the fishfinder’s performance.
For down-looking and scanning transducers, you’ll want to hold the transducer bracket against the transom and lower it until it’s in a position to locate the face of the transducer about 1/8th of an inch below the running surface of the hull. For side-lookers the location will depend a bit on manufacturers. Some are designed with a flat top surface and a long, rounded bottom that needs to be submerged for side-finding capabilities. Some others have a seam which can be used to locate the effective waterline. Either way, follow the manufacturer’s instructions on how far to have the transducer submerged and remember that the running waterline, not the boat’s waterline at rest, is what counts. Get it right and many side-finders will work to some degree at surprisingly fast speeds but if you locate that transducer too high, as soon as the boat starts rising up out of the water it’ll lose its abilities. Here's a short video demonstrating the installation of a side-finding fishfinder transducer istallation:
Yes, we know this can be confusing – and once again, we have to note: If you have doubts, hire a pro to do this job.
Whether you're installing a side-finder or a traditional transducer, the rest of the steps are the same. With the bracket location identified, use the mounting template to mark the transom. Hold the transducer in place and view it from different angles, to be sure you’re meeting all the recommended parameters. But before mounting the transducer bracket, run the transducer line to the dash. In the best-case scenario there will be a wiring rope left in the run by a conscientious builder who thought ahead to make your life easier. If not, and if your boat had an old fishfinder with a transom mount than won’t be re-used, cut the transducer off the end and use the old wire to draw the new one through the wiring chase. Otherwise you’ll need to get a wire fish and start from scratch to pull the new transducer wire and plug through. (Have fun! This can be exceedingly difficult, especially in older boats with multiple wire runs going through enclosed tubes and around bends.) Pull all excess wire through until it’s behind the helm station, coil it, and tie-wrap it in place. Note: Never cut a transducer wire to size; creating new connections in it will likely lead to performance problems.
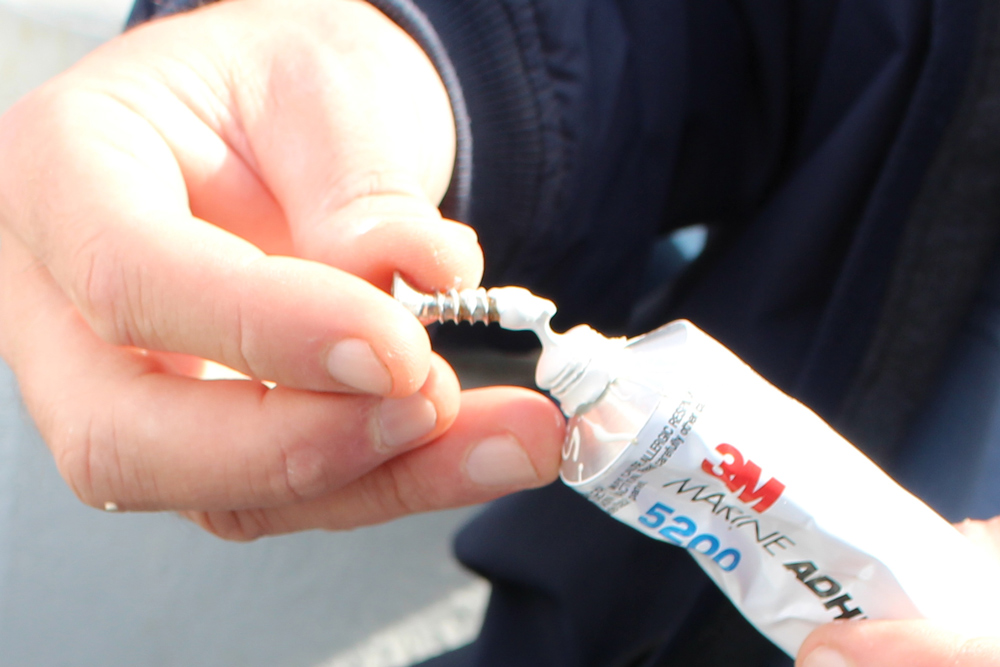
With the wire run, the template in place, and double- and triple-checking its positioning complete, drill pilot holes for the bracket’s mounting screws. Then use 3M 5200 adhesive/sealant to liberally coat the mounting screws. (Below the waterline it’s best to use 5200 instead of 4200, since it has stronger adhesion properties). While holding the bracket in place, screw in the mounting screws. Use lots of goop, here – the last thing you want is holes in your transom which let water soak through. Once you’ve got the bracket in place, mount the transducer in it and tighten it up.
Next, you can use the small wire clamps included with your fishfinder to secure the transducer wire up the back of the transom and to the rigging tube. You’ll want to secure it every foot or so, and make sure there are no droops or looseness in the wire. If your boat has wiring routed under the gunwale as opposed to in a rigging tube, use tie-wraps to secure it wherever possible along the run. Again, be sure to eliminate drooping or loose areas of wire because slack wires may rub against fiberglass as the boat runs, causing chaffing over the years. TIP: Don’t bundle the transducer wire with the engine’s wiring harness, which can cause electrical interference in some cases.
Making the Final Fishfinder Connections
Now you’ll need to run the unit’s power leads to the terminal block. Again, check the wires and secure them wherever possible. Use heat-shrink connectors where possible and spray all of the connections with a generous helping of a good corrosion inhibitor, like CorrosionX or Boeshield T-9. If your unit is a combination fishfinder/chartplotgter and your VHF does not have GPS built in, now’s the time to also connect the NMEA in and out wires to feed your VHF the GPS position data, so you can activate DSC. Tempting though it may be to cut a corner or two at this stage of the game, don’t fail to take this step – with active DSC if you call the Coast Guard in an emergency, they’ll immediately know your exact position and details about your boat as you transmit.
Finally, plug the transducer and power cables into the back of the unit.
Okay: you may want to launch the boat and go for a test-run asap, but first make sure it sits long enough to allow the 5200 to thoroughly dry. It takes up to a week to cure completely, and you definitely want to let that stuff have plenty of time to kick. Then and only then, it’s time to launch the boat see how the unit performs at rest and on plane. It’ll probably work fine when the boat’s sitting still or moving at no-wake speeds, but remember that problems often arise with transom-mounts when running on plane. If your unit loses the bottom reading when you firewall the throttles, you’ll have to adjust the transducer height on the mounting bracket. Move it down a hair, then launch again and re-test the unit. If you go down too far, you’ll likely throw a rooster-tail into the air when the boat’s on plane and also have a higher risk of striking damage. Continue re-launching and moving the transducer up or down in the bracket until you find the best location, re-gooping if you have to loosen any screws to move the bracket.
One last time: if any of this seems a bit too daunting for your taste, remember that there are plenty of reliable, highly-qualified marine electronics installers. It may cost a bit more to have an expert do the installation job, but this is your fishboat we’re talking about – few things in life are more important!